Creating Listening post
Information for Repeto contributors
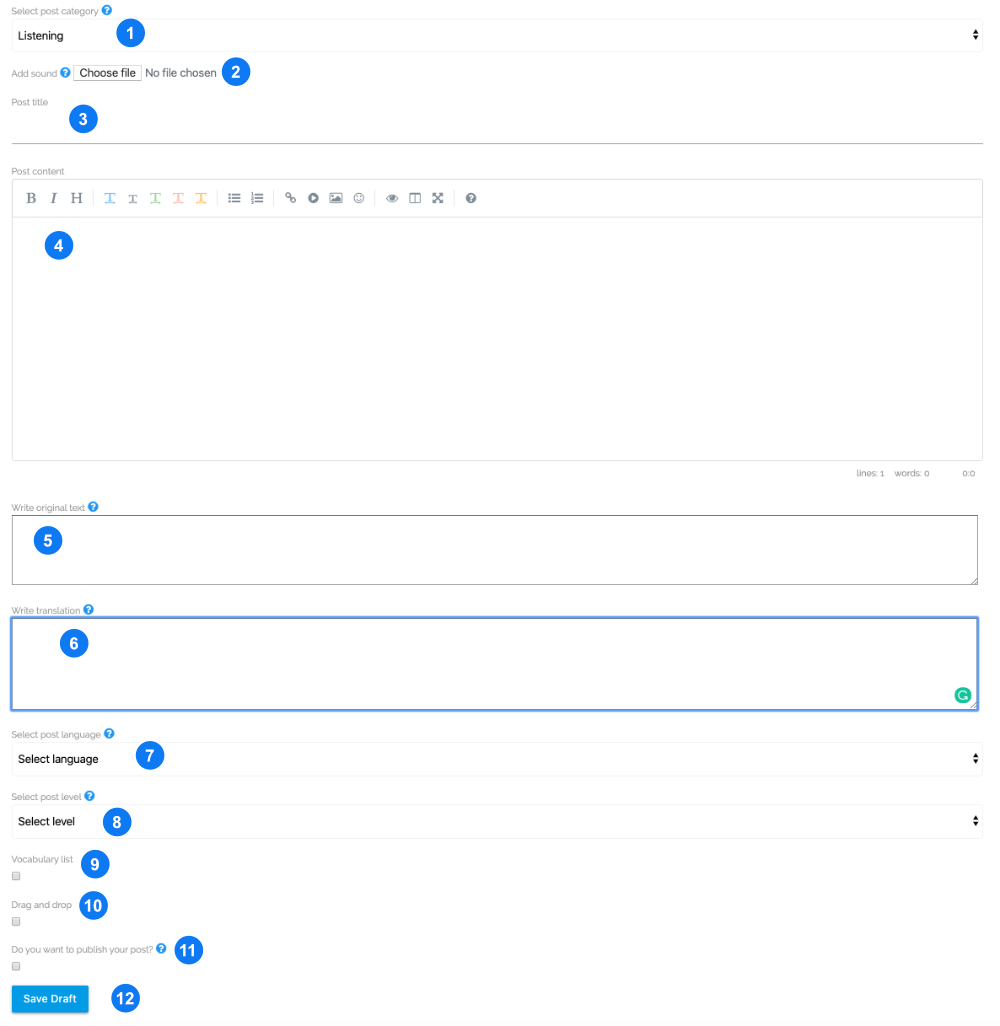
If you choose Audio in the first step, the form will look similar to this. Please find the description below the screenshot:

1. Select post category? - if you change your mind and you want to create the different category of post, you can still do so. The information below describes creating a Listening post.
2. Add sound - this is for posts with audio and podcasts, therefore, you need to add a file with the sound. The file containing voice recording should be of good quality and in mp3 format. To attach the file, click the button and point to file location on your computer. When you save your post, the post will display an audio player allowing the recording to be heard.
3. Post title - please provide a title referring to the content of the post.
4. Post content - for Audio posts, enter here an introduction informing about your recording and what it contains, what students can learn from it, etc.
5. Write original text - this field is used for audio articles. This field should contain a transcription of your recording. For instance, if the audio file contains the Italian language, this field should contain the exact text in the Italian language from the recording.
6. Write translation - here we put the English transcription of the Original (previous field). It should be fairly literal transcription that will allow learners to understand the original audio and text.
Please note: both Write original text and Write translation text should contain the same formatting. If Original contains for instance 5 paragraphs, the Translation needs to contain also 5 paragraph. The content of the paragraphs should also be the same in the sense that it should contain the same sentences (of course they will be in two different languages)
7. Select post language - choose the language you creating a resource for. If you describe English irregular verbs, this will be English. This is not a compulsory field if you write a general article 'How to remember vocabulary quickly' leave this field as it is so the post will not be linked to any particular language.
8. Select post level - choose the language level of the post. There are 3 choices: Beginner, Intermediate and Advanced. This option will help users to quickly find the content according to their language levels.
9. Vocabulary list - this checkbox needs to be marked if you want to display vocabulary list below your post. Mind you, in order for vocabulary list to appear correctly, it needs to be created elsewhere (words and phrases need to be added and also they need to be linked to the post). So this option is only for displaying Vocabulary list and not creating it.
10. Drag and drop - this checkbox needs to be marked if you want to display drag and drop exercise below your post. Mind you, in order for exercise to appear correctly, it needs to be created elsewhere (words and phrases need to be added and also they need to be linked to the post). So this option is only for displaying Drag and drop exercise and not creating it.
11. Do you want to publish your post? - you can decide whether the post will be published on the site or will it be saved in our Drafts. For example, you can work on the post for a few days, saving it in the drafts and only publish it when it is ready. If you want to publish it, mark the checkbox.
12. Save Draft / Publish Post - depending on your choice in the previous step, you will be able to either Save Draft or Publish Post by clicking the blue button.
Video tutorial
We have also a short tutorial in video form explaining how to create a post. Please have a look below: